EC Garden Hop Plots - established in 2009
The Merry Growlers of Davis was a small informal group of homebrewers. The group is no more. However, their greatest legacy, the hop plots at the EC garden are now managed and owned by the Greenbelt Brewers Assocation. If you have any questions about the hop plots contact the GBA board from the club website.
Mike Matiasek, one of the original members of the Merry Growlers of Davis was interviewed in the "September issue" of Davis Life Magazine about the activities of the Merry Growlers of Davis. Sorry the link is dead... I will see if I can locate it...
In 2009, Mike Matiasek, Andy Gray, Francis Corbett and Christian D'Souza started growing hops at the EC garden. Here's some information about our experience.
Hops require a soil with good drainage, a sunny exposure and shelter from the wind if possible. Hops are well known for their prolific growth; they can grow up to a foot a day in high season and up to 30 feet over the course of a growing season. In order to achieve this prolific growth, the require a tall sturdy trellis to climb on and lots of water.
We chose to grow the hops on a 10'x20' plot at the EC garden. The EC Garden is a great place to garden for many reasons of which I will name a few;
-
Great community of gardeners
-
Free tools and water
-
Top quality clay loam soil which is more or less ideal for growing all kinds of fruits and vegetables, hops included.
 the finished raised beds Raised Bed Construction: Before beginning, the soil needs to be cultivated and the weeds removed. To do this we first cut all the weeds at soil level, then dug the entire plot picking out all the weeds, then built two, 20 foot long beds that were each about 2 feet wide with a 3 foot wide path running between it. The most important thing we wanted to accomplish at this stage is to remove all the bermuda grass, and get the soil aerated and with good soil structure. So to make this easier we began the digging about 1 week after the winter rains ceased in March 2009, this way the soil is soft but does not clump together. When constructing the beds we first dug down about one foot in depth under each bed-to-be and piled the soil in the center of the plot so that we could loosen the soil with a digging fork at the bottom the beds. Then we moved the soil back into the beds in layers, and in between each layer we added a sprinkling of compost and steer manure. Then to make a raised bed we continued to dig down in the center of plot, what will become the path, and transfer the soil to the beds with layers of compost and manure. Each time we completed a layer of soil, compost and manure we would briefly mix them with a shovel. We did this process twice, to produce the two beds. Here is a picture of how the beds looked at this point.
 Hop Rhizomes Planting the Hop Rhizomes: We planted two different varieties of hops, Cascade and Centennial. Cascade is an all round hop that is used for both aroma and bittering and has a pleasant citrus or grape fruit aroma and flavor. Whereas centennial is mostly a bittering hop due to its high alpha acid content. To keep the two varieties separate, we dedicated each bed to a variety and planted 6 rhizomes per bed for 12 total rhizomes. Keeping the varieties physically separated and trained on different sections of the trellis will make harvesting the hops much easier.
We purchased 4 of our rhizomes from freshops and the other eight we took the cuttings directly from established plants from under the EC garden sign. We took the cuttings in mid march, which is a good time to take cuttings in this climate, which is when shoots are only just starting to emerge. Then we buried the rhizomes in a small hole with a little bit of organic cotton seed meal fertilizer to give them a head start. The rhizomes were each 3 feet apart which is the minimum distance for planting hops, but since they are the same variety we though it would work well and economize on space. Once planted we covered them with a little compost and watered them in and gave subsequent watering every 2-3 days.
Building the Trellis: Hops can grow up to 30 feet in height, but are frequently trellised at 18-20 foot heights. In industrial operations, tall posts 4 inch posts are used to support heavy cable which spans each row in the hop yard. From the cable, twine is dropped down and staked next to the plants, for the vines to grow up on. This was not really practical for our hop plot, since we did not have much room at the end of our plot to bury a cable anchor. So instead of connecting the top of our posts with cable we framed it with 2x4s, which adds strength and will never sag in the middle like a horizontal cable or rope would if not properly tensioned. For the posts, we were going to use 4x4in lumber, but Berry Lumber ran out of 16 foot 4x4's, so they gave us 16 foot 4x6's instead for the same price... score!
First we dug the post holes with a 6" hand bucket auger to 3.5 feet, which was as deep as the auger would go, but conveniently industry standard is a minimum of 3 feet. So now we have 6 holes; on the ends of the 2 beds and a hole in the middle of each bed. Once the holes were dug we put in each post one at a time, and using a level we made sure that posts were straight and square. Once straightened we packed dirt around each post with rebar and small 2 inch thick wooden posts. Once the posts were in place, we cut 2x4s to frame the top of the trellis, 4 x 8.5' lengths for each long side and 3 x 5 foot lengths for the short side (the ends and middle). These 2x4s were screwed into place, with 4 x 3 inch screws per end. The overall dimensions of the trellis are 5' wide, 19 feet long and about 12.5 feet tall. All lumber was Douglas Fir. When burying lumber, red wood or cedar is the most resilient to rotting but these types are also much more expensive. We substituted variety of wood with more wood; the 4x6 posts will not be coming down anytime in the near future.
 Sonja digging the post holes with a bucket auger
  The trellis half constructed
  Andy drilling the 2x4 frame into the main posts
  The finished trellis in the evening sun
  The finished trellis from the north
 The irrigation system Installing the Irrigation System: Hops require lots of frequent and deep watering to achieve their rapid and prolific growth. Given the frequency of rain in the central valley during the summer, we decided to install a drip irrigation system and automatic watering timer. We choose to give each plant 2 dedicated 2 gallon/min drip emitters which we purchased at ACE hardware. At this point we also added rice hulls as a mulch to the paths and beds. You can see in the finished trellis picture above the rice hulls in the path. This image was taken right before adding the rice hulls to the bed. The rice hulls are a great mulch and have multiple benefits.
-
Weed barrier
-
Slow organic soil amendment
-
Prevents soil cracking and rapid water evaporation
 Adding twine to the trelis and training the vines Training the Bines: As the plants become established they begin to send up vines, or bines, as they are called. The bines are trained onto twine that has been suspended down from the top of the trellis. There are lots of way to trellis hop bines, but for these hops, because it is their first season we chose to go with the 2 twines per plant and each twine we train three to four bines. The bines are trained by wrapping them around the twine in a clockwise direction, once trained they will continue to grow up the twine unassisted. The twine can be any string that is available but the industry standard is Coir Fibre derived from coconut, this twine is especially thick and grippy for the hops to climb.
 Keeping the beds mulched and weed free
 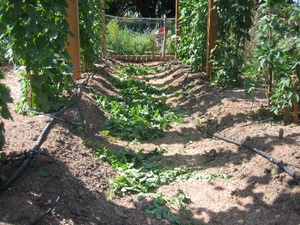 Pruning the bines Bed Maintenance: Once the hops are trained, all that is left to do is maintenance, which during a typical California summer means irrigating the plants about 2 times per week for about 1-2 hours, weeding the beds on a weekly basis, training new shoots/bines, and fertilizing the plants or managing pests as need be. In general the plants require around 10-20 gallon of water per week, and this can be delievered in 1-2 applications. The weeding will be more intensive during the spring and early summer, and once July and August arrive the weeds start to slow down. Also, during this time, the extra bines should be pruned back to the ground so there are only 3 bines per twine, or 6 bines total for these plants since it is their first season. Next season we will have three twines per plant and therefore 9 bines total per plant.
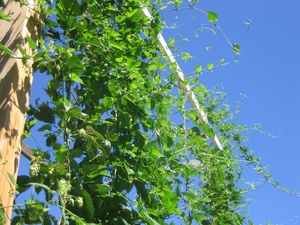 Side shoot formation
  The full grown hop plot Fertilizing and pest management: The biggest things to continue to maintain healthy hop plant growth is good deep watering, that is not overly frequent. This will help keep the plants healthy, productive and more disease resistant. However, it is a good idea to supplement the soil midway through the season with a general purpose fertilizer. I have tried several different ones and have yet to settle on a favorite. These include, blood meal, biosol, cottonseed meal, all purpose organic fertilizer and lastly homemade organic fertilizer. The other soil amendment that I have used in the past is soil sulfur which is used to lower the pH of the soil. In Davis, the water is very alkaline and after a summer of irrigation, the soil pH can rise dramatically, making nutrients less bioavailable to plants. You can read more about this phenomenon at the Redwood Barn Nursery here. All the amendments can be bought locally in Davis at stores such as Ace Hardware and the Redwood Barn Nursery.
 Hop cone formation
 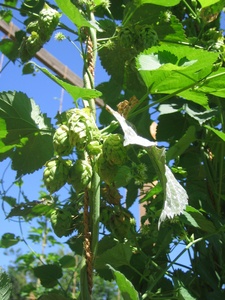 Hop cone formation Cone develpment: Once you are gotten this far most of the hard work is done. The trellis is built, the bines are trained, you are occasionally pruning surplus bines, pulling weeds, and of course watering. You will notice as the season progresses, and if the plants are established and healthy that after they reach the top of your trellis they will begin to produce side shoots. This is a good sign because it is on the side shoots where you will harvest the most hops. If there are no side shoots it will likely be only 2 hops yielded for every leaf pair, which are usually every 6 inches in height. With side arms you can have dozens of hops on one arm. So how do you know when they are ready? It is not as clear as in some fruits and vegetables, such as a red tomato. With hops you want to be monitoring several factors as the cones develop; 1. the aroma of the cone, 2. the dryness/wetness of the cone, 3. the color of the cone, 4. any browning that may occur on the cone or petioles (the petioles are the first tiny leaves above the cone) and lastly the color and presence of lupulin (yellow powder in the cone). The aroma you are looking for will depend on the variety; in the case of cascade we were waiting for the aroma to be a strong floral and citrusy. When the cones are ready they should start to dry out and feel papery to the touch and open up slightly. Sometimes the cone color will lighten slightly when they are "ripe". When browning starts to occur at the tips of the petioles they are ready, if not a touch too late, although slight browning is not the end of your crop. Lastly, and perhaps most importantly, when you split a cone vertically in half up the middle you should be able to see dark yellow lupulin and smell its fragrance, this is the part of the cone that you are after. The lupulin will also be slightly sticky to the touch... although this is more obvious after handling a lot of hops. To summarize, the dryness and aroma followed by presence of dark yellow lupulin are the most important.
 untying the bines for picking
 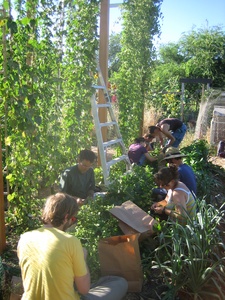 Merry growlers and their extended network of pickers Harvesting: So you have decided the hops are ready, it's time to harvest! This year, 2009, that occurred on the first week of August in Davis, CA. Depending on how many hops you have you will decide the most efficient manner to pick them. As far as the actual picking goes there is no real method, just grab the cone and pull, and make an effort not to destroy the cone, to keep the lupulin protected inside the cone. For us, since we had 12 plants to pick, it was easiest to untie the twine at the top and lay the bines on the ground for "group picking". This way we did not need multiple ladders. Remember these plants are in their first season, so we were not expecting tons of hops, however, Cascade went above and beyond the call of duty by producing about 6 full brown paper grocery bags full of hops, where as Centennial only produced about 2. After picking, it is important to dry the hops immediately AND keep them out of direct light (in the dark). There are many ways in which you could do this but we chose to use large walk in ovens (cheating I know) that were at 140F. You could do the same thing in your own kitchen oven... a convection oven would be ideal if you did not have too many hops. But the trick is to have a thin layer of hops, one layer ideally, and air circulating. When these conditions were met, our hops dried out in about 12 h. You will know when they are dry, they will start to open up and feel brittle and very light and papery. Once dry, the ideal way to store the hops is to vacuum package them and then freeze them. The hops will have little depreciation in their alpha acid content and quality if they are frozen for up to a year or more. If they are stored at refrigerator temps they will depreciate noticeably in months and at room temperature... well don't bother growing hops if you plan on storing them at room temp. Once packaged, we took out a small sample to send to the "Brew Laboratory" for alpha acid content analysis. While knowing the alpha acid content is not essential it will be helpful when designing beer recipes. Alpha acid content is the chemical in the hops that makes beer bitter, so if you know the exact content you can have greater control over the brewing process. However, hop varieties have a published alpha acid (AA) content range, you could use the average of this range as your AA content. In the end we ended up with nearly 8 pounds of dried Cascade and 3/4 of a pound of dried Centennial. The alpha acid content of Centennial was 10.5, right in the middle of the published range (9.5-11.5).
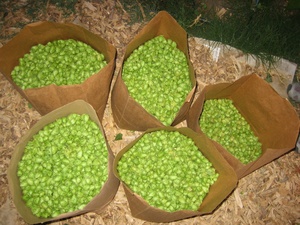 there were actually nearly 8 bags of hops at the end of three nights of harvest
  HOPS!
HOPS! 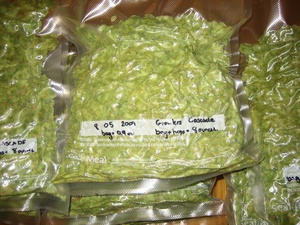 the vacuum packaged hops
Fall Tidying: All that remains in the Fall is to cut back the vines and add soil amendments. We made an effort to leave the bines intact so that the plants could continue to "grow" into the fall and provide strength for the roots for the first winter. Once the bines have started to dry out and die back you can cut them at the soil surface. Some people will break them into pieces and pile them over the hop mounds, as an organic amendment. I would use caution with this approach, if you had any suspicions of virus or fungus during the growing season... better to get it out of the hop yard. Once the bines are cut off, you can amend the soil with manure and compost and mulch in the paths. In our case in Davis CA, the winter rains will incorporate these amendments over the winter and rebuild the soil health for next season.
Winter 2010 Update: With not much work being required in the winter, it is a good time to consider expanding your hop yards. The Merry Growlers will be doing just that, doubling the size of the hop yard this winter. We will build a second trellis and plant two more varieties of hops in the spring, most likely styrian and Mt Hood, descendants of "noble" hop varieties.
 The second trellis March 2010 Update: New Trellis constructed! The new hop rhizomes will be Magnum and Mt Hood. Both are descendants of Hallertau, but magnum is a clean high alpha acid bittering hop and Mt Hood is more of a dual purpose bittering and aroma hop which is more like classic hallertau.
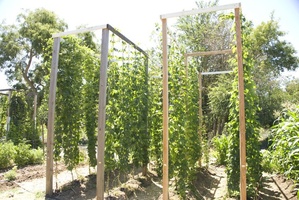 July 2010 September 2010 Update: We harvest around 15 dry pounds total of the four varieties. Cascade is still the vast majority at around 10 pounds, and the rest distributed pretty evenly over the 3 others, Centennial, Mt. Hood and Magnum. Here is an image from the middle of the summer.
2009-04-10 12:44:15 Uh oh. If this is where I think it is, then it may well be blocking solar access for a person who has gardened the same plot for nearly 30 years. Why wasn't she notified of this before it was built? —BarbaraKing
2009-04-13 17:13:39 The hopyard doesn't affect the solar access for those garden plots, as the shadow is cast upon the trail and not the plot space. —TimQuick
2009-04-16 15:07:32 Awesome guys! Thanks for the inspiration. —ZN
2009-05-13 21:03:30 awesome page. —PxlAted
2009-06-02 19:22:29 You'll update once the hops have grown, right? I'm very curious about how this ends up, :D —ChristyMarsden
2009-06-29 16:19:47 Updates are planned of the hop plot progress all summer until harvest in August and September. Thanks for your interest. —matiasek
2009-07-26 22:35:37 This is a great page! —jefftolentino
2009-10-30 00:08:27 I misread this as "Merry Growers of Davis"... —SteveDavison
2010-02-14 00:09:33 Wow! Both this page and your project at the EC Garden are totally amazing. You've truly fulfilled UC Davis' designation as a land-grant institution in order to "teach... agriculture and the mechanic arts... in order to promote the liberal and practical education of the industrial classes [that's us, folks] in the several pursuits and professions in life" as described in the Morill Land-Grant Act(s). And it's there for everyone, because it's FREE. Many thanks to the Merry Growlers of Davis, to Davis Wiki, and to the EC Garden for making this a reality! —TimQuick
2010-02-17 17:00:12 Thanks Tim! —matiasek
2010-03-09 16:25:42 This looks awesome! I'm a Davis homebrewer - looking for any extra labor for this fall to help double your yield? Be happy to contribute to buying the rhizomes also. —JohnW
2010-03-10 14:24:07 Thanks for offering John. We do invite new members to join in the hop project, periodically, but at the moment we are set for the season. We are about to build a second trellis and plant 2 more varieties of hops. You should come to a Greenbelt brewers association meeting, we have a good group of brewers... and some hop growers too! Meeting info is on the GBA wiki page. —matiasek
2010-03-11 11:36:16 Great! I'll join you soon - can't make this Tuesday, as my li'l one has a Little League game, but I've got it in my calendar! Maybe I'll have a few bottles left of the yummy triple-hopped IPA that I cracked last night. Or the next batch! Look forward to meeting you and the group. —JohnW
2010-03-11 14:15:59 Sounds good John! Feel free to email the president of GBA, email on the web page, if you want to get added to the email list so that you are "in the loop". It is anywhere from 0-6 emails a day. It is a great brewing resource. —matiasek
2010-05-14 23:09:58 I met a group of the Merry Growlers tonight, and saw their awesome hop trellis. Some of the nicest people I've ever met! —TomGarberson


Comments:
You must be logged in to comment on this page. Please log in.