Sandbox is available for you to play around with the various editing features that LocalWiki has to offer. On this page, you can learn and practice how to edit an article before moving on to contribute to a real LocalWiki page!
Remember that if you become confused at any point, our Tutorial page offers simple and helpful tips on making your first page.
Click "Edit" to begin interacting with this page. Please do NOT save changes to the page so that others may benefit from Sandbox.
Skill #1: Adding Text
After clicking the "Edit" button, click anywhere on the page or in existing text and begin typing. Try clicking in the following sentence and adding in the missing words:
The mother called for her son to come house and dinner.
Skill #2: Modifying Text
Text can be made larger or smaller by highlighting the desired text, clicking on the pull-down tab in the toolbar, and choosing a different size.
Try changing this sentence to different sizes!
You can also bold, italicize, underline, or cross through text. Use the buttons on the far left of the toolbar to modify those words in the preceding sentence. (example: italicize)
Skill #3: Adding a Picture
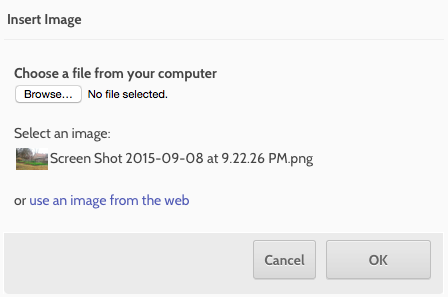
Simply add a picture by clicking on "Image" in the toolbar. You can either choose your own photo or add one from the internet using a URL.

Try re-inserting the photo above by going to "Image" and clicking on that picture.
Skill #4: Modifying a Picture
Users may want to edit the size or add a caption to a picture that they post on a Wiki page or to an already existing image. To do this, double click on the picture. A menu will appear that will allow the user to change the height and width of the photo (measured in pixels), Users can also reset the photo to its original size by clicking on the arrow icon. This menu will also allow users to change the alignment of the photo, and decide whether or not a to display a border.

To add or edit a caption, click on the photo once, and a caption box will appear at the bottom of the photo.
Try to edit the size of any image on this Sandbox page, and add a caption.
Skill #5: Creating a Table
Tables allow users to organize information in a convenient and visually appealing way. A table can be made by clicking the "Table" icon in the toolbar. Then, add the desired number of rows and columns for the table, as well as the desired height and width of each row and column in either pixels or percent. If you do not input a height or width, the table will expand as text is entered.
Try to re-create the table below. You will need to have 6 rows and 2 columns for this table.
| Skill #1 | Adding Text |
| Skill #2 | Modifying Text |
| Skill #3 | Adding a Picture |
| Skill #4 | Modifying a Picture |
| Skill #5 | Creating a Table |
| Skill #6 | Adding a Hyperlink |
*Creating a table will be different depending on the browser being used. It is easiest to create a table using Google Chrome or Mozilla Firefox, as the table will be created where the cursor is positioned when you click the "Table" icon. If Internet Explorer is used, the table will default to the top of the page, and must be manually moved editing the HTML of the page (accessed by clicking the "Source" tab in the toolbar). Therefore, it is easiest to avoid adding a table on Internet Explorer.
Skill #6: Adding a Hyperlink
Hyperlinks allow site visitors to quickly jump to relevant pages. They can link to other pages in LocalWiki, like this one to the Explore page, or to sites outside of LocalWiki. A hyperlink is created by highlighting a word or words, clicking "Link" in the toolbar, and replacing the text there with a URL.
Here is the URL to the main LocalWiki Help page: https://localwiki.org/main/Help
Try using that URL to add a hyperlink to the phrase "LocalWiki Help".


