
These instructions will eventually be posted at the Bike Church self-service station, but before that they need a little bit of sprucing up. So please make edits that will make the instructions simpler and more concise. Also add anything that was forgotten or change anything that is incorrect. This may not be wiki ethical, but I would like to ask if this could be kept specific to the self-service station. After it has been physically posted we can change it to a more general how-to. Thanks, JasonMoore
If you find your tire limp, lifeless, and at a loss of air, you may have a flat that needs repairing. Most flat tires need a simple blessing to bring them back to life and you don’t have to be a minister to do this. So if you aren’t familiar with repairing your flat tire, follows these simple instructions and your bicycles will be on the path to salvation once again.
Supplies and Tools you will need (these will be available at the repair station):
- tire levers — these are hard plastic tools that let you pry the tire off. You can 'get creative' and use something like a well-made spoon to subsitute, but don't use a screwdriver or anything sharp!
- patch kit or new tube (depending on the damage)
- crescent wrench - if your bicycle does not have quick release levers
- marker (sharpie, chalk, etc.)
- air pump
Get to Work:
-
Pump the tire up to see if still holds air, it may very well have been a slow leak or the valve was somehow depressed. If that is the case you can ride away. But, if you find the tire is flat the next day, then you have a slow leak and will need a patch. If it the tire deflates immediately, then you will need to either patch the hole(s) or replace the inner tube. Inner tubes can be purchased from the bike church or some other shops. Patch kits are available at the self-service center for a 50 cents donation per patch.
-
Most likely before the wheel can be removed from the bike the brake jaws must be opened. This can be accomplished by activating the quick release lever (some bikes) or releasing the cable at brake (cantilever, v-brake, and cheaper sidepull).
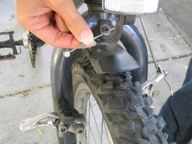 Releasing a cantilever brake
 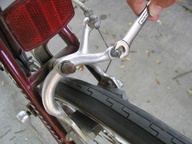 Un-clamp the cable on an old side pull
 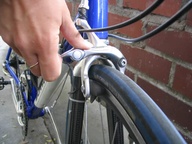 Activate the release lever


-
By either using the quick release or the adjustable wrench remove the wheel from the bicycle. Flipping the bicycle upside down may make this more manageable. Hold the derailleur out of the way to easily remove a rear wheel on a multispeed bike.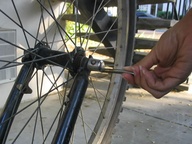 Quick release
  Use a wrench
 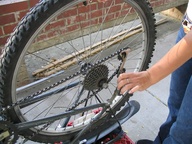 Hold the derailleur out of the way
-
Remove the cap from the tire valve and deflate the tire as much as possible. This is done by pressing in the center of a Schrader valve with a small object or unscrewing the tip of a Presta valve and depressing it with your finger.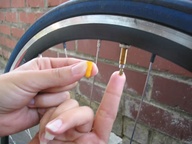 Presta valve
 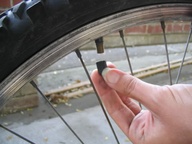 Schrader valve
Remove the cap from the tire valve and deflate the tire as much as possible. This is done by pressing in the center of a Schrader valve with a small object or unscrewing the tip of a Presta valve and depressing it with your finger. Presta valve
  Schrader valve
-
Pinch the tire away from the rim. Using two tire levers, pry one side of the tire loose from the rim being careful not to damage the inner tube. 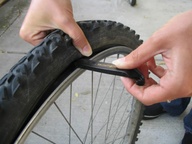 Pinch the tire
 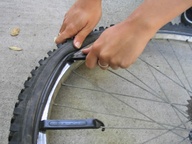 Pry one side loose
Pinch the tire away from the rim. Using two tire levers, pry one side of the tire loose from the rim being careful not to damage the inner tube.  Pinch the tire
  Pry one side loose
-
Remove the inner tube from the tire/rim by starting with the valve stem. The nut on a Presta valve will need to be removed.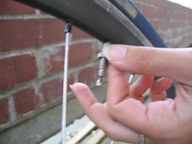 Remove the rim nut
  Remove the tube
Remove the inner tube from the tire/rim by starting with the valve stem. The nut on a Presta valve will need to be removed. Remove the rim nut
  Remove the tube
-
Inflate the inner tube and locate the leak. If the leak is small you may need to submerge the tube in water to find the hole.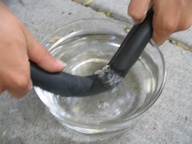 Submerge the tube into water
Inflate the inner tube and locate the leak. If the leak is small you may need to submerge the tube in water to find the hole. Submerge the tube into water
-
Mark the location of the hole with a marker and deflate the tube. If the hole is very large (gaping) or it is on the valve, a new tube will be needed. If a new tube will be used skip to step 17.
-
Open the patch kit and choose a suitable size patch. Use the smallest one that is necessary.
-
Use the sandpaper to roughen an area larger than the patch around the tube. Sandpaper and marked hole
 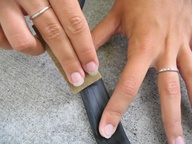 Roughen the tube
Mark the location of the hole with a marker and deflate the tube. If the hole is very large (gaping) or it is on the valve, a new tube will be needed. If a new tube will be used skip to step 17.
Open the patch kit and choose a suitable size patch. Use the smallest one that is necessary.
Use the sandpaper to roughen an area larger than the patch around the tube. Sandpaper and marked hole
  Roughen the tube
-
Apply a thin layer of rubber cement to the roughened area. Make it slighty larger than the patch..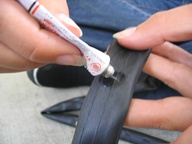 Apply rubber cement
Apply a thin layer of rubber cement to the roughened area. Make it slighty larger than the patch.. Apply rubber cement
-
Let the rubber cement dry for five minutes, in the meantime check the tire and rim for any sharp objects that may have caused the hole and remove them. You can gently run your fingers along the inside of the tire to check for sharp things. This is an important step, as you could quickly get another flat if the object isn't removed.
-
Once the cement is dry remove the foil backing from the patch and press the patch onto tube over the hole..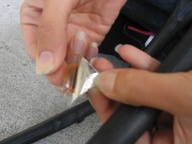 Remove the foil
Let the rubber cement dry for five minutes, in the meantime check the tire and rim for any sharp objects that may have caused the hole and remove them. You can gently run your fingers along the inside of the tire to check for sharp things. This is an important step, as you could quickly get another flat if the object isn't removed.
Once the cement is dry remove the foil backing from the patch and press the patch onto tube over the hole.. Remove the foil
-
Knead the patch onto the tube and make sure no air bubbles are present.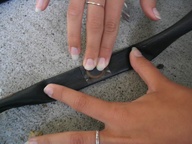 Apply pressure
Knead the patch onto the tube and make sure no air bubbles are present. Apply pressure
-
Remove the clear plastic from the top of the patch. -Or not. It is possible that your glue hasn't 100% cured. Often the patch will come with the plastic when peeled. There is no real reason to peel the plastic off. 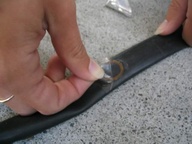 Carefully
Remove the clear plastic from the top of the patch. -Or not. It is possible that your glue hasn't 100% cured. Often the patch will come with the plastic when peeled. There is no real reason to peel the plastic off.  Carefully
-
While the glue cures check the inside of the tire and the rim for what may have been the cause of the flat and eliminate the the chance of it causing another. This will hopefully save you the trouble of having to patch the tube twice in one day.
-
Insert the valve stem back through the rim (if Presta style, replace the rim nut) and then insert the rest of the tube into the tire, making sure that the tube isn’t twisted or bunched.
-
If you can, do not use tools to reseat the tire. Instead, put your thumbs along the rim and use your palms to "roll" the bead of the tire back onto the rim. If you must, use the two tire levers to seat the tire back into the rim, but be extremely careful not to pinch the tube. Alternately, you can try pinching the sides together all along the rim to seat the tire better, making it easier to finish the job.  Reseat the tire
While the glue cures check the inside of the tire and the rim for what may have been the cause of the flat and eliminate the the chance of it causing another. This will hopefully save you the trouble of having to patch the tube twice in one day.
Insert the valve stem back through the rim (if Presta style, replace the rim nut) and then insert the rest of the tube into the tire, making sure that the tube isn’t twisted or bunched.
If you can, do not use tools to reseat the tire. Instead, put your thumbs along the rim and use your palms to "roll" the bead of the tire back onto the rim. If you must, use the two tire levers to seat the tire back into the rim, but be extremely careful not to pinch the tube. Alternately, you can try pinching the sides together all along the rim to seat the tire better, making it easier to finish the job.  Reseat the tire
-
Slowly inflate the tube and make sure the tire is seated evenly on the rim. You may need to get a 'converter' to get a more common Schrader valve pump to work with a Presta valve. 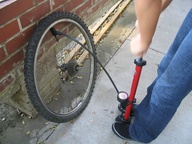 Pump the tire
Slowly inflate the tube and make sure the tire is seated evenly on the rim. You may need to get a 'converter' to get a more common Schrader valve pump to work with a Presta valve.  Pump the tire
-
Reattach the wheel to the bike. The derailleur may need to be held out of the way when attaching a mutlispeed rear wheel. Make sure the wheel is centered within the bike.
-
Tighten the bolts or quick release levers properly. Close off (Presta only) and cap the valves.
-
Reactivate the brake release levers or reset the brake and tighten the clamp nut.
-
Voila! The tire is fixed.
Reattach the wheel to the bike. The derailleur may need to be held out of the way when attaching a mutlispeed rear wheel. Make sure the wheel is centered within the bike.
Tighten the bolts or quick release levers properly. Close off (Presta only) and cap the valves.
Reactivate the brake release levers or reset the brake and tighten the clamp nut.
Voila! The tire is fixed.
Should you wait between putting on the patch and inflating the tire? I don't and I have never had a problem, but it might still be a good idea.-JasonMoore
Also, using as little glue as possible (but still adequately covering the surface area), allows for quicker drying, but also a better rubber-to-rubber bond, rather than creating a "glue-scab" which will break open.-JaimeRaba
2006-09-17 16:38:03 Shouldn't some mention be made about inspecting the tire for whatever caused the flat? It doesn't help much to fix the flat if you're going to immediately get another flat ... —KaiTing
Thanks that is a good suggestion, I think I have made the neccessary change! - RobertMcMurry
2006-12-19 17:57:49 yes, someone should. I went by the bike church and they said that this station was kinda defunct... —StevenDaubert
2007-07-23 22:13:27 Any advice as to whether a patch-rubber cement complex is particularly superior or inferior to a a self-adhesive patch (e.g., Flat Boy Self-Adhesive Patch Kit, by Specialized)? —LeonardMarque
I've had mixed results with the self-adhesive patches. They work ok if the hole is tiny, but I've had them fail before. I think they are somewhat sensitive to how much you abrade the surface of the tire, whereas the rubber cement is more tolerant and can patch bigger holes. —ArlenAbraham
Avoid the self-adhesive patchs at all costs. I've had self-adhesive patches fail every time I've used them (twice). I've NEVER had the traditional patches bust on me and I've done more of those than I can count. The self-adhesive patch is also a pain to clean up when you want to repatch with a REAL patch. —WilliamLewis
2007-07-23 23:26:10 I have some shots taken of me fixing a slow leak on my front tire, taken by JA at wiki BBQ
perhaps I should incorporate them —StevenDaubert
2010-06-13 07:41:41 Before Step #3, I find it easiest to change a tire when I change the rear gears to the largest cog. —jono
-
General rule of thumb (and what most people find easiest) is to change gears to the smallest cog (the hardest/highest gear on the shifter). This gives you the most slack in the chain and most ability to manually move the derailleur as necessary. If going largest is best for you, keep on keepin' on! —BrettHall


Comments:
You must be logged in to comment on this page. Please log in.